
At ZettaScale, we are developing a next-generation middleware called Zenoh. Zenoh gained a lot of traction with very positive feedback from diverse industries, including Robotics, Industrial Automation, Automotive and more. If you haven’t tried it yet and you think it could help you, don’t hesitate, we guarantee it’s easy and worth your time!
This blog post will focus on another exciting project we are building: Zenoh-Flow. As its name indicates, Zenoh-Flow brings together the control of data flow programming and the power of Zenoh. Think of distributed applications where you don’t have to know the exact location of your computing units, but simply agree on the name (and type) of the resources they are going to exchange, how they are connected and, if needed, the properties of the host(s) on which they are going to run. Add to this list a validation step, uniquely named resources, great performance and you would start to have a good idea of what Zenoh-Flow has to offer!
Let us dive in!
Zenoh-Flow 0.6.0-rc: Getting Started
blog-post-31-01-2024. We will update this blog post once we have released Zenoh-Flow 0.6.0-rc. To clone this version you can use the following command:git clone https://github.com/eclipse-zenoh/zenoh-flow --branch blog-post-31-01-2024 --depth 1To facilitate the discovery of Zenoh-Flow we have included in the repository an example data flow called “getting started”. Similar to the very first program you write in every programming language, its purpose is to print a sentence akin to “Hello, world!”. However, as we are building a data flow and using Zenoh, we have to introduce slightly more logic and we have to make our flow interact via Zenoh.
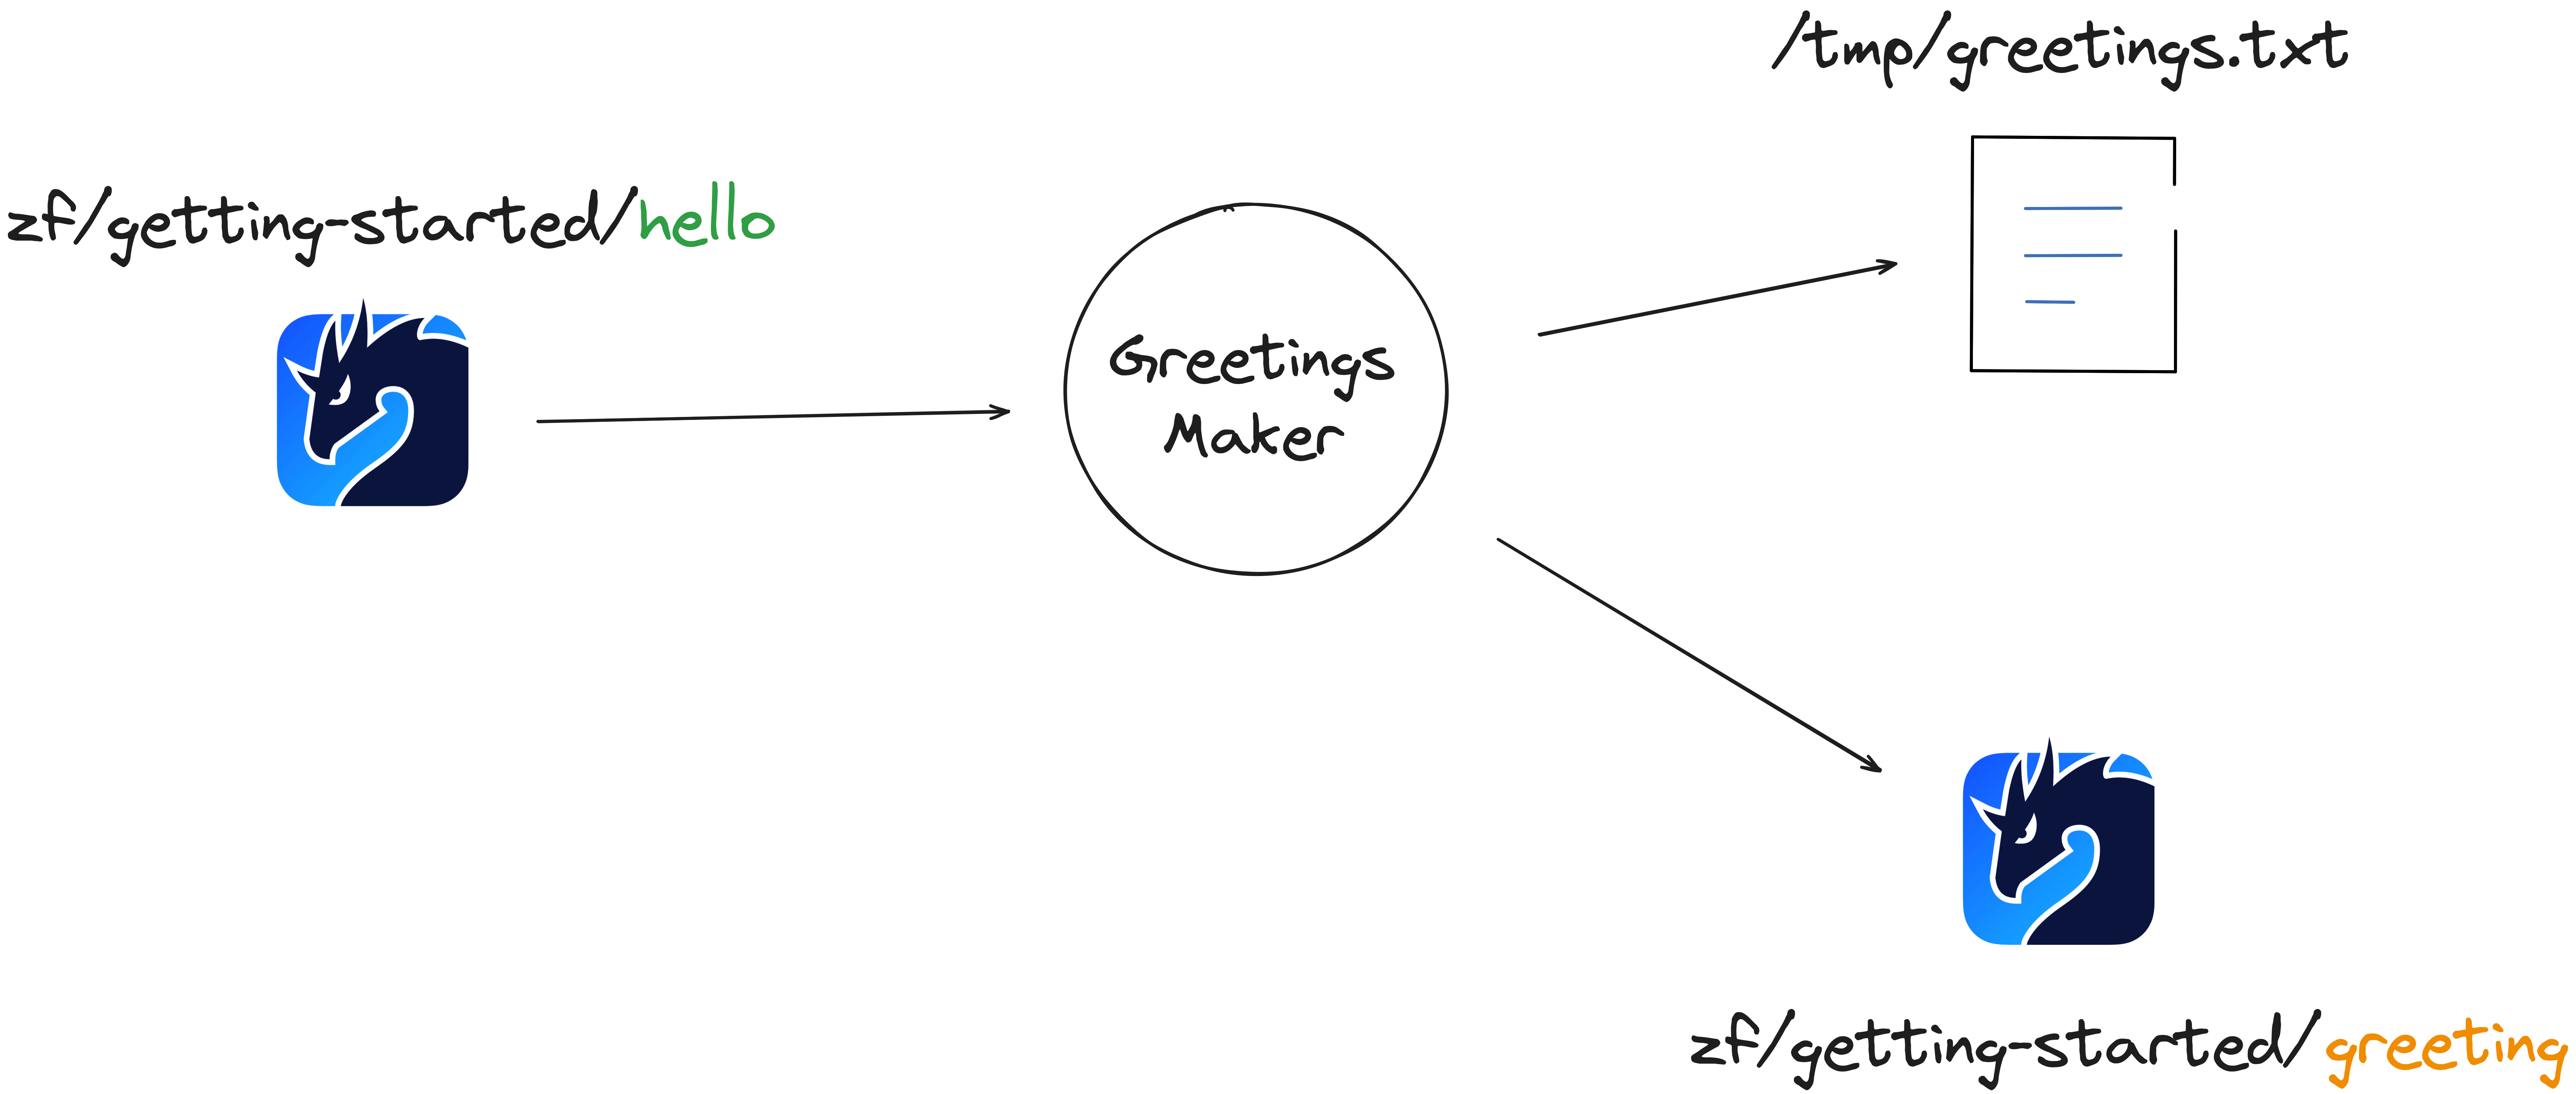
Hence, our getting started will subscribe to the resource zf/getting-started/hello — a Source — in the hope of receiving names, then it will forward this name to a node that will generate a greeting — an Operator — and finally forward the generated greeting to be both published on Zenoh, on the resource zf/getting-started/greeting, and written to a file — two Sinks.
This flow is already written in the file: zenoh-flow/examples/flows/getting-started.yaml.
Data Flow Descriptor
name: getting-started
[Required] We start with the name of the data flow. It is a human-readable summary of what your data flow will do. Zenoh-Flow will use it when displaying information regarding its status.
vars:
  TARGET_DIR: "/home/zettascale/zenoh-flow/target"
  BUILD: "debug"
  DLL_EXTENSION: "so"
[Optional] The “variables” section. They allow performing text replacements inside a descriptor and any of its nested descriptor(s) before your data flow is processed by Zenoh-Flow. This is useful if, for instance, you regularly switch between machines with different paths, operating system and build.
To indicate that you are using one such variable in your descriptor, you have to escape it between “moustaches” like so: {{ TARGET_DIR }}.
The standalone Zenoh-Flow runtime and daemon allow to change these variables through a command line argument if you want to manipulate them in scripts.
sources:
  - id: zenoh-sub
    description: The Source receiving the names
    zenoh-subscribers:
      hello: "zf/getting-started/hello"
[Required] The sources section lists all the nodes that feed data to your data flow. Sensors or “events” (e.g. a publication on a Zenoh resource) are good examples. Without sources a data flow can never process data as it will never receive any.
The id has to be unique within your data flow. The same applies to other nodes.
This source is a specific built-in Zenoh-Flow provides, it is a Zenoh subscriber. It is ready to be used inside any data flow and simply expects a description and an association list port-id: key-expression.
The port-id has to be unique within the zenoh-subscribers subsection. More specifically, a port-id has to be unique per node and per port type (i.e. input or output). Which means the same port-id can be repeated between different nodes and within the same node as long as it applies to different port types. Here the zenoh-subscribers map to outputs.
Regular Zenoh-Flow sources (i.e. where you have to provide an implementation) follow the same structure as operators with the only exception that a source does not have an inputs subsection.
operators:
  - id: greetings-maker
    description: "This node will create the greeting, transforming for instance 'John' to: 'Hello, John!'"
    library: "file://{{ TARGET_DIR }}/{{ BUILD }}/examples/libgreetings_maker.{{ DLL_EXTENSION }}"
    inputs:
      - name
    outputs:
      - greeting
[Required] The operators section lists all the nodes that manipulate data. They receive data in their inputs, manipulate them, and send the results in their outputs.
The library subsection points to the shared library where the implementation resides. For now, only the file:// schema is supported which means that the path has to be valid on the machine where the operator will run.
sinks:
  - id: file-writer
    configuration:
      file: "/tmp/greetings.txt"
    library: "file://{{ TARGET_DIR }}/{{ BUILD }}/examples/libfile_writer.{{ DLL_EXTENSION }}"
    description: "This Sink will write the greetings in a temporary file."
    inputs:
      - in

  - id: zenoh-writer
    description: The Sink publishing the result of the processing
    zenoh-publishers:
      greeting: "zf/getting-started/greeting"
[Required] The sinks section lists all the nodes that will send the results of the data flow processing to the outside. In this particular example we have two sinks: the sink file-writer writes the result in the file
/tmp/greetings.txt and the sink zenoh-writer publishes it on Zenoh on the resource zf/getting-started/greeting.
Note that the sink file-writer has a configuration subsection. This subsection allows passing the values declared there to your node when Zenoh-Flow creates it. This is useful if you want to change the behaviour of your node without having to recompile it or if you want to reuse the same node several times with just a tweak in its parameters.
Any node can have this subsection (expect builtin Zenoh nodes). It can also appear at the data flow level if all your nodes share a common configuration subset, such that you do not have to repeat it. Similar to the vars sections, a global configuration section is propagated to nested descriptors.
links:
  - from:
      node: zenoh-sub
      output: hello
    to:
      node: greetings-maker
      input: name

  - from:
      node: greetings-maker
      output: greeting
    to:
      node: file-writer
      input: in

  - from:
      node: greetings-maker
      output: greeting
    to:
      node: zenoh-writer
      input: greeting
[Required] The links section details how your nodes are connected. Its verbose format is there to ensure that your links are valid.
Zenoh-Flow will guarantee several crucial properties regarding these links and your data flow:
- An output is connected to an input.
- All outputs and inputs are connected.
- Multiple deployments of the same data flow are automatically isolated. In other terms, there is no data cross-contamination. This property is guaranteed through the use of unique identifiers within each data flow and is automatically added by Zenoh-Flow.
There is a last optional section, the mapping, that we did not include in this descriptor. We will detail why and its contents when we will explain how to launch this data flow.
At this point you should have a better grasp of how a data flow in Zenoh-Flow is structured. One point that should be clarified before we can launch it is how to write the logic of a node.
Node Implementation
We are going to detail the code located in the greetings-maker operator as an Operator is the only node that has both inputs and outputs. We will point out the small differences, when compared to a Source or a Sink, throughout the explanation.
The code we describe is located in: zenoh-flow/examples/examples/greetings-maker/src/lib.rs.
use prost::Message as pMessage;
use zenoh_flow_nodes::prelude::*;
The first line imports the Message trait from the Rust implementation of Protobuf. Protobuf is a serialization / deserialization library that works across programming languages. This will allow us to tell Zenoh-Flow how to deserialize / serialize the data we receive / send — if needed!
On a technical note, we have to rename it as we are also defining a Message structure in Zenoh-Flow.
The second line imports everything you need to write an Operator from the zenoh-flow-nodes crate.
#[export_operator]
pub struct GreetingsMaker {
    input: Input<String>,
    output: Output<String>,
}
This snippet creates a structure called GreetingsMaker that has one input and one output, both of type String. Inputs and Outputs in Zenoh-Flow can be typed to facilitate data manipulation: once you tell Zenoh-Flow how to perform the deserialisation / serialisation, it will do it automatically when needed.
The #[export_operator] procedural macro on top of the structure is to expose the correct symbols such that Zenoh-Flow can dynamically load your shared library. This is a required step and we feel leveraging a macro is the easiest way to get it right for developers.
#[export_sink] procedural macro and a Source #[export_source].#[async_trait::async_trait]
impl Operator for GreetingsMaker {
async fn new(
_context: Context,
_configuration: Configuration,
mut inputs: Inputs,
mut outputs: Outputs,
) -> Result<Self> {
Ok(GreetingsMaker {
input: inputs
.take("name")
.expect("No input 'name' found")
// NOTE: the method `take` returns an `InputBuilder` and the method `typed`
// creates a typed Input.
.typed(|bytes| String::from_utf8(bytes.into()).map_err(|e| anyhow!(e))),
output: outputs
.take("greeting")
.expect("No output 'greeting' found")
// NOTE: similarly, the method `take` returns an `OutputBuilder` and the
// method `typed` creates a typed Output.
.typed(|buffer, data: &String| data.encode(buffer).map_err(|e| anyhow!(e))),
})
}
}
This snippet tells how Zenoh-Flow can create an instance of your Operator. We require you to implement the Operator trait that consists of a single asynchronous function: new.
It’s arguments are:
_contextcontains the information regarding the environment in which your node will run. For instance, the name and unique identifier of the Zenoh-Flow runtime that will execute it._configurationcontains the associative list ofkey,valuethat you gave in the descriptor file. It is a reexport of theserde_json::Valuestructure, which provides a lot of flexibility.inputscontains the receiving channels Zenoh-Flow created for your operator. As we can see, in order to access an input you must provide an identifier, the same that you declared in the descriptor. This point is important: the identifier in your code must match what is written in the descriptor. Thetypedmethod constructs the final structure your code will manipulate and requires for that the function to deserialise bytes into the desired type.outputsis the sending counterpart of theinputs. It bears the same requirements with the difference that the typed method requires a serialisation function.
The procedural macro #[async_trait::async_trait] is to allow for the definition and usage of asynchronous method in traits.
#[async_trait::async_trait]
impl Node for GreetingsMaker {
    async fn iteration(&self) -> Result<()> {
        let (message, _) = self.input.recv().await?;
        if let Message::Data(characters) = message {
            let name = characters.trim_end();

            let greetings = match name {
                "Sofia" | "Leonardo" => format!("Ciao, {}!\n", name),
                "Lucia" | "Martin" => format!("¡Hola, {}!\n", name),
                "Jade" | "Gabriel" => format!("Bonjour, {} !\n", name),
                _ => format!("Hello, {}!\n", name),
            };

            return self.output.send(greetings, None).await;
        }

        Ok(())
    }
}
The last part of the implementation of our Operator is the Node trait and its method iteration. This method is what Zenoh-Flow will call, in a loop, until you decide to stop your data flow (or if an unfortunate event happens).
As the signature of the method indicates, this method takes an immutable reference to your operator’s instance. If you want to persist state, then you need to leverage the interior mutability pattern. This is a design choice of Zenoh-Flow: providing a mutable reference would hinder the performance of all nodes, even those that do not need to mutate it.
If an iteration returns an error, Zenoh-Flow will log it and resume the execution of your operator. Speaking of execution, let us briefly explain how Zenoh-Flow drives the execution of a data flow.
Execution Model: Data-Driven
In version 0.6.0-rc and the previous ones, Zenoh-Flow supports a single execution model: data-driven. This model is relatively simple: each node runs in its own task and is driven by its I/O operations. If there is no available input then the node will be parked by the executor, only to be woken up when data has been received.
The following line from the Operator implementation is a perfect example:
let (message, _) = self.input.recv().await?;
The await keyword in Rust indicates asynchronous events where the executor can park the node.
We already have implemented another execution model and are working on a second one that we keep for the following minor release of Zenoh-Flow, stay tuned! As a form of teaser, these other execution models offer more control than the data-driven one which in turn leads to (much) better performance.
Now that we have seen how to define a data flow, how to implement an Operator and how Zenoh-Flow drives the execution of the nodes, the next step is to launch your first flow!
Launching a Data Flow
Zenoh-Flow provides two ways of starting a data flow: via a standalone runtime or via a daemon (and its associated command line tool zfctl).
The standalone runtime will only run a single data flow and will only deploy nodes on the machine on which it is started. We believe it is beneficial for prototyping or realising benchmarks.
We offer two flavours of the daemon: a standalone daemon and a plugin for Zenoh. Both offer the exact same functionalities with the difference that the standalone daemon does not require you to start and configure a Zenoh router. We recommend using the daemon when you need to deploy a data flow on several Zenoh-Flow runtimes. Our daemon and command line tool have been designed to help you in this specific scenario, automating the deployment as much as possible.
Running the example requires first to compile the example we want to run:
# We are assuming that you are at the root of the Zenoh-Flow directory.
cargo build --examples
With the Standalone Runtime
Compile the executable (if you want a release profile, add --release) to the command below:
cargo build -p zenoh-flow-standalone-runtime
Simply launch the following command and you are set:
./target/debug/zenoh-flow-standalone-runtime ./examples/flows/getting-started.yaml
If you want to modify some of the variables in the vars section of the data flow you can execute instead:
./target/debug/zenoh-flow-standalone-runtime \
    # macOS
    --vars DLL=dylib \
    # release build instead of debug
    --vars BUILD=release \
    ./examples/flows/getting-started.yaml
Fire up a Zenoh subscriber and / or launch tail on the file /tmp/greetings.txt to see the results:
# In a first shell
z_sub -k "zf/getting-started/greeting"

# (optional) In a second shell
tail -f /tmp/greetings.txt

# In another shell
z_put -k "zf/getting-started/hello" -v "Alice"

# You should see "Hello, Alice!".
With the Standalone Daemon
Running a data flow on a daemon requires slightly more preparatory work.
First we need to compile the executable we need:
cargo build -p zenoh-flow-standalone-daemon -p zfctl
We then need to start the standalone daemon:
./target/debug/zenoh-flow-standalone-daemon my-first-daemon
You should see something along the lines of:
The id is the unique identifier of the Zenoh-Flow runtime contained within your daemon called “my-first-daemon”. This id is important if you want to control where the different nodes composing your data flow will run. As we mentioned earlier when we described the different sections of a data flow descriptor, there is an optional section mapping.
The section mapping allows defining on which Zenoh-Flow runtime a node should run. For instance, the snippet below tells Zenoh-Flow to launch all nodes on the runtime of our daemon “my-first-daemon”.
mapping:
  92af6ef5bdab227a95993f3f73cb9f6e:
    - zenoh-sub
    - greetings-maker
    - zenoh-writer
    - file-writer
If a node is omitted, Zenoh-Flow will default to launching it on the runtime that was contacted. How to choose which Zenoh-Flow runtime to contact? Our command line tool zfctl lets you specify the unique identifier of a runtime or selects one randomly for you if you don’t specify one.
If you want to list all the available Zenoh-Flow daemon on your network you can use zfctl like so:
./target/debug/zfctl runtime list
Hence, assuming there is only one Zenoh-Flow daemon running on your network, the two commands below are equivalent and both create an instance of the data flow “getting-started”:
./target/debug/zfctl instance create ./examples/flows/getting-started.yaml
# is equivalent to:
./target/debug/zfctl instance  --runtime 92af6ef5bdab227a95993f3f73cb9f6e create ./examples/flows/getting-started.yaml
You should then see the unique identifier of the instance of this data flow echoed in the logs. Note it down, as if the creation is successful, this is through this identifier that you can manage it.
We have to make two comments regarding this last sentence:
- First, “successful creation”. There could be scenario where the creation failed. If, for instance, you requested part of the data flow to run on a Zenoh-Flow runtime that is not reachable via Zenoh then Zenoh-Flow would abandon the creation (and ask the Zenoh-Flow runtime(s) that were, successfully, contacted to rollback).
- Second, “creation”. When managing a data flow via a daemon, we separate the creation from the running phase, meaning that no Zenoh-Flow runtime will automatically start it.
If we assume that the data flow was successfully created and its unique identifier is d392a6b5-b284-4d26-96c4-35372d860978 then to start it, on all runtimes, one should enter:
./target/debug/zfctl instance start d392a6b5-b284-4d26-96c4-35372d860978
Just like with the standalone runtime, enter the following commands on different shells to confirm that the data flow is executed correctly:
# In a first shell
z_sub -k "zf/getting-started/greeting"

# (optional) In a second shell
tail -f /tmp/greetings.txt

# In another shell
z_put -k "zf/getting-started/hello" -v "Bob"

# You should see "Hello, Bob!".
Conclusion
This blog gave you an overview of how to write your first data flow using the Zenoh-Flow framework. We have seen the different sections that compose a data flow descriptor, we have seen what is required to write an Operator, how Zenoh-Flow is (for now!) a data-driven framework and, lastly, how to start your data flow with either the standalone runtime or via a daemon.
As we have indicated at few occasions, we are still in the process of polishing minor aspects and will update the blog post as soon as the 0.6.0-rc version is released. We are also working (among other exciting features!) on other execution models that we will progressively unroll with other minor releases of Zenoh-Flow. The first one, guided execution, will come with version 0.6.1-rc and will be the object of a dedicated blog!
Until then, happy coding!